Documentation Index
Fetch the complete documentation index at: https://guide.cloud.blnkfinance.com/llms.txt
Use this file to discover all available pages before exploring further.
Overview
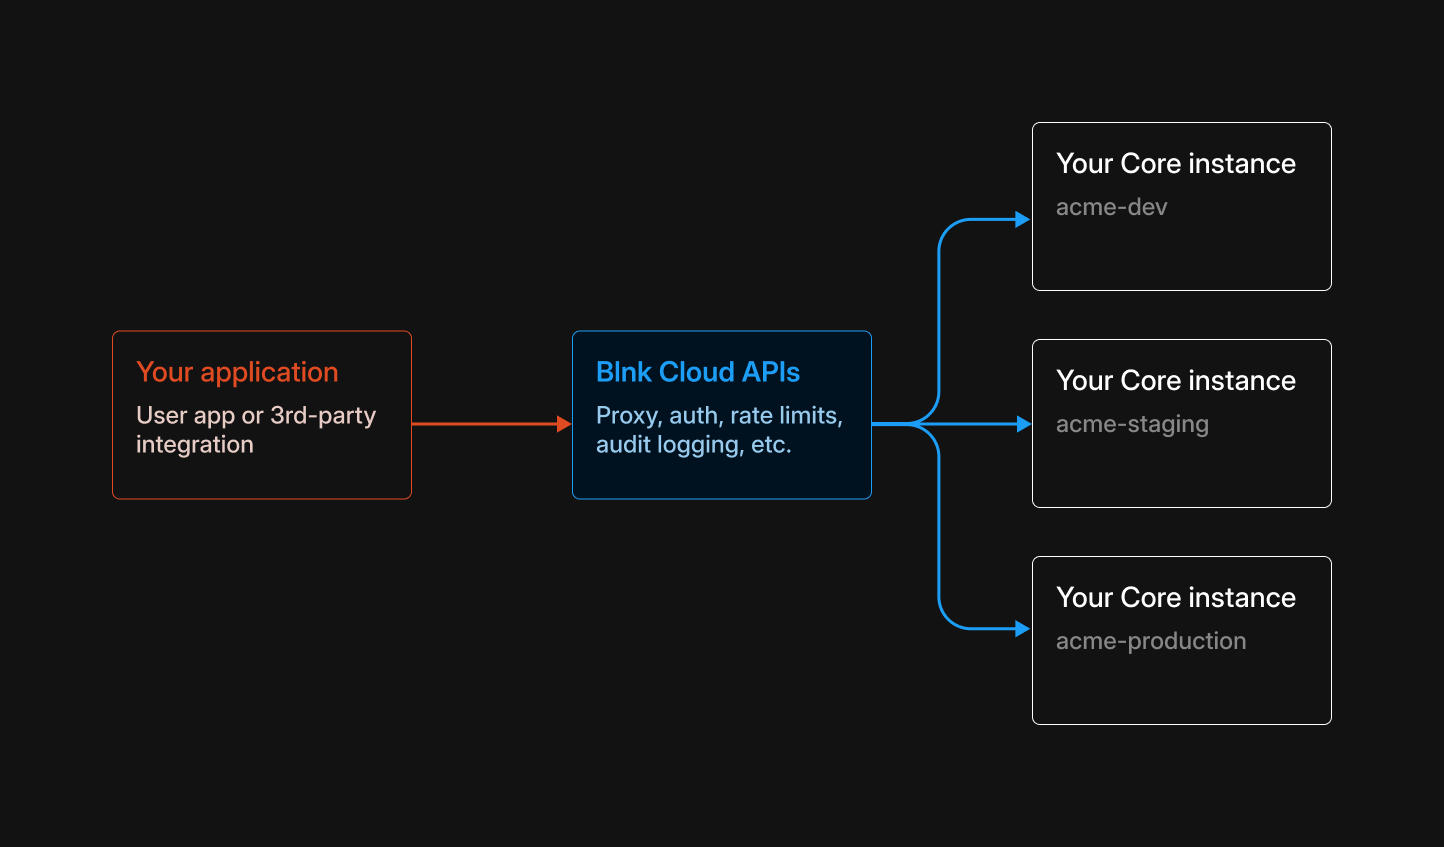
The Cloud Proxy lets your app send HTTP requests to a Blnk Core instance through Blnk Cloud, instead of connecting to Core directly. Blnk Cloud:- authenticates your request
- uses
instance_idto determine which Core instance to target - forwards the request to that instance
- returns the Core response back to your app
How it works
- Your app makes requests to Blnk Cloud, using a single base URL.
- You authenticate using an access token. Ensure that your OAuth key includes the
proxy:writeor (or*) scope to create or update resources. - You include an
instance_idso Cloud knows which Core instance to route the request to. - Cloud forwards the request to the specified Core instance.
URL structure
Instead of calling Blnk Core directly:instance ID:
Read our OAuth docs to get the access token here.
Create your first set of records
Here is a minimal flow that matches how Blnk is used in practice:- Create a ledger (for example, named after your app).
- Create two balances in that ledger.
- Create a transaction from one balance to the other.
Create a ledger
Create a ledger named after your app to group your balances:
Save the returned
ledger_id – you will use it when creating balances.Create two balances
Create two USD balances in that ledger:Run the same request again to create a second balance (you will get a different
balance_id).Save both
balance_id values – you will use them as source and destination in Step 3.Create a transaction between the balances
Move money from Balance A (source) to Balance B (destination):
If the transaction returns
status=QUEUED, Core applies it asynchronously. To verify the final state, fetch the transaction (and updated balances) via the Data API.Working with metadata
Ledgers, balances, transactions, and identities all support metadata (meta_data) — custom key–value data you attach for enrichment, tagging, or integration, e.g. customer_id, channel, region, approval_status.
Choose a top-level key for your app
Use a single top-level key (for example, your app name) under
meta_data so your enrichment does not clash with user-defined or other apps’ metadata:Call the metadata update endpoint
Call the following URL to enrich metadata:
<resource_id>: The ID of the resource you want to update (for example, aledger_id,balance_id,transaction_id, oridentity_id).
meta_data:- If a key already exists, the value you send overwrites it.
- If a key does not exist, it is added.
Enrich a resource
Use the tabs below to see example metadata updates for each resource type:
- Ledger
- Balances
- Transactions
- Identities
Update metadata on a ledger, e.g.
project_owner, description, etc.cURL
See all available endpoints
To see all the Core endpoints you can call through the proxy, use the Blnk Core API reference. Use the Core docs to determine the request path, HTTP method, and body. Then send the same request through Blnk Cloud via the Cloud Proxy base URL,Authorization header and the instance_id query parameter, as shown earlier on this page.